Stop losing money! Without Meta Pixel, you may be missing out on crucial insights and losing money on your ads. In this article, we will explore what Meta Pixel is and guide you on how to set it up to optimize your advertising campaigns.
What is a Meta Pixel?
A pixel is a small piece of code that you can add to your website’s header. It is designed to enhance your ad performance by tracking how people interact with your website. By collecting user data, the pixel provides valuable information that can be used to track conversions, optimize ads, and build retargeting audiences.
The Importance of Meta Pixel
Meta Pixel plays a crucial role in maximizing the effectiveness of your advertising efforts. Here are three key benefits it offers:
1. Conversion Tracking: Meta Pixel enables you to track conversions from your ads. By understanding which ads are generating the most conversions, you can refine your marketing strategies and allocate your budget more effectively.
2. Ad Optimization: With Meta Pixel, you can gather insights about how users engage with your website after clicking on your ads. This data helps you identify areas for improvement and optimize your ads to increase their performance.
3. Audience Retargeting: Meta Pixel allows you to build custom audiences for retargeting. By tracking user behavior on your website, you can create specific audience segments and deliver tailored ads to reconnect with potential customers who have shown interest in your products or services.
Setting Up Meta Pixel
Now that you understand the importance of Meta Pixel, let’s walk through the process of setting it up. Follow these steps:
Step 1: Log in to your Meta Business Manager
If you don’t already have a Meta Business Manager account, you can create one by referring to our guide on “How to Create a Meta Business Manager.” Once you’ve logged in to your account, proceed to the next step.
Step 2: Access the Pixel Setup

In your Business Manager account, select “Data Sources” from the menu. Under “Data Sources,” you will find the “Pixel” option. Click on it, and then select the “Add” button.
Step 3: Name Your Pixel

Give your pixel a descriptive name that represents its purpose. Consider the possibility of creating multiple pixels in the future, so choose a name that will help you identify the specific pixel easily.
Step 4: Set Up the Pixel

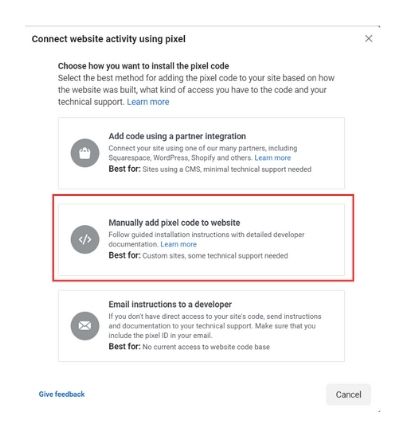
After naming your pixel, click on “Continue” to proceed with the setup. In this step, you have two options: “Manually add pixel code to website” or “Add code using partner integration” (for platforms like WordPress, Wix, or Shopify). If you choose the manual option, follow the instructions provided by Meta to add the generated code to the header of your website.
Step 5: Confirm Installation

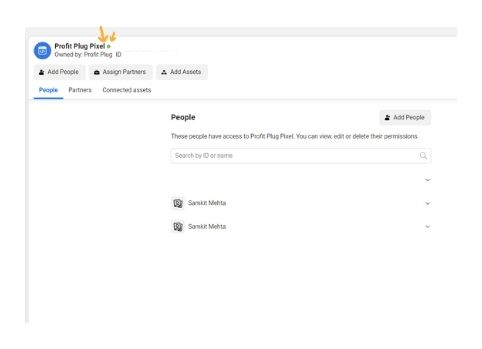
After adding the pixel code to your website, you should verify if it has been installed correctly. One way to check is by looking for a small dot associated with the pixel status. A green dot indicates successful installation, while a red dot signifies an error. Ensure that the dot is green to confirm the pixel is set up properly.
Using Google Tag Manager for Pixel Installation
If you prefer to use Google Tag Manager for installing the pixel code, follow these steps:
- Copy the pixel code provided by Meta.
- Go to your Google Tag Manager account and navigate to your container.
- Create a new tag and select “Custom HTML.”
- Paste the Meta Pixel code into the HTML field.
- Choose the trigger to fire the tag on all pages.
- Save the tag, publish your changes, and the pixel will be installed via Google Tag Manager.
- Setting Up Conversion API for Meta Pixel
With the recent iOS update, configuring the Conversion API has become essential. Follow these steps to set it up:
Step 1: Access Business Manager Settings
Navigate to your Business Manager settings and locate “Brand Safety and Suitability.” Click on the drop-down icon and select “Domains.”
Step 2: Add a New Domain
Click on “Add” and select the option to create a new domain.
Step 3: Enter Your Website Domain
Enter your website domain without the prefixes “http://” or “https://.” This ensures accurate domain verification.
Step 4: Verify Your Domain
Choose the “Domain TXT” method for verification. Access your DNS host account and add the TXT code provided by Meta to your domain’s settings.
Step 5: Wait for Verification
Allow at least two hours for the TXT records to propagate and the domain to be verified. Then, click on the “Verify” button to confirm the verification status.
Prioritizing Events (Note: Updated Approach)
Previously, it was necessary to prioritize events for tracking, but Meta’s Aggregated Event Measurement eliminates the need for manual prioritization. This feature streamlines event tracking and provides a more efficient setup. Stay updated with Meta’s guidelines and updates regarding event measurement.
Conclusion
Setting up Meta Pixel is crucial for maximizing the effectiveness of your advertising campaigns. By tracking conversions, optimizing ads, and building retargeting audiences, you can make data-driven decisions and enhance your overall ad performance. Follow the steps outlined in this article to set up Meta Pixel successfully and start reaping the benefits of improved ad tracking and optimization.
Remember, Meta Pixel is an evolving tool, and it’s important to stay informed about updates and changes in its functionality. If you found this article helpful, feel free to follow me on Instagram @Samkitmehta.in for more insightful content. Additionally, you can download the PDF version of this setup guide for future reference.
